
Adding a New Post to WordPress with Beaver Builder
WordPress introduced the new editor Gutenberg with their 5.0 update. This is a radical change from the classic editor, which in turn, will bring radically different results to your website. While most think such a significant change in the design and feel of WordPress will bring a slew of technical and user difficulties, that is not the case. Gutenberg is new, but it is quite easy to master with the correct walk-through.
This article is centered on creating new posts or blogs within a WordPress website using the Beaver Builder Plugin. With this add-on, you will create CPTs (Custom Post Types). A CPT is, in essence, just a post or blog that is designed within itself, not necessarily matching with the rest of the design of the website. This can help you if a post needs to contain more data or represent the data in a certain way. Usually, this means inserting code into your theme, which WordPress advises against. However, Beaver Builder makes this much more straightforward and user-friendly.

Adding a Post to WordPress with Beaver Builder
Before you create a new post, please be sure to go to your WordPress Plugin Directory to find and install the Beaver Builder plugin. If you bought a premium version of Beaver Builder from an outside source, use the Upload Plugin option to incorporate it into your WordPress website. You will need to go to the WordPress Admin Panel, then go to Settings > Beaver Builder > Post Types and make sure Posts is selected.
-
In your WordPress Admin Panel, go to the Posts option and click on New. This will give a blank template for a new post.

-
Now, you will want to set a title for your post. Next, you will want to save your post as a draft to avoid losing any progress.

-
On the right in your post editor, you will see Permalink. From here, you will want to modify your URL Slug. This step will help you increase the shareability and SEO of your posts.

-
Just below the Permalink option, you will see Featured Image. Take this time to set your posts featured image by selecting one from your media library or uploading an image from your computer. This will be the image displayed on the thumbnail of your post.

-
Click on the Launch Beaver Builder button. This will open your drag-and-drop editor included with Beaver Builder. You will now be able to see a live preview of what your post will look like when published, all while you are editing it.

-
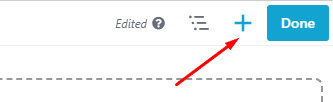
Click on the “+” sign on the top right side of the page, and you will reveal a few cool options like Modules and Templates. If you want to use a template, you can search for the one you like, click on it, and select Replace Existing Template. You will then edit the placeholder modules to include the text and images you want with your post. You may also use the drag-and-drop feature to add new modules to your post.


-
Now that you have your post exactly how you want it, you can click on Done in the upper-right-hand corner of the page. This will give the options to Discard, Save Draft, or Publish your fresh new post. Alternatively, you can also click on the Tools menu in the upper left-hand corner of the page. This will give you multiple options to Save Template, Publish Template, Duplicate template, etc.


Ready to Give it a Try?
Beaver Builder is the perfect editor for anyone who likes a drag-and-drop website design approach. Since there is no need to know HTML coding, anyone can quickly make a beautiful and professional post on their website. Following these steps should make the process even easier. If you still need help, give us a call or contact us!